Ensaimada
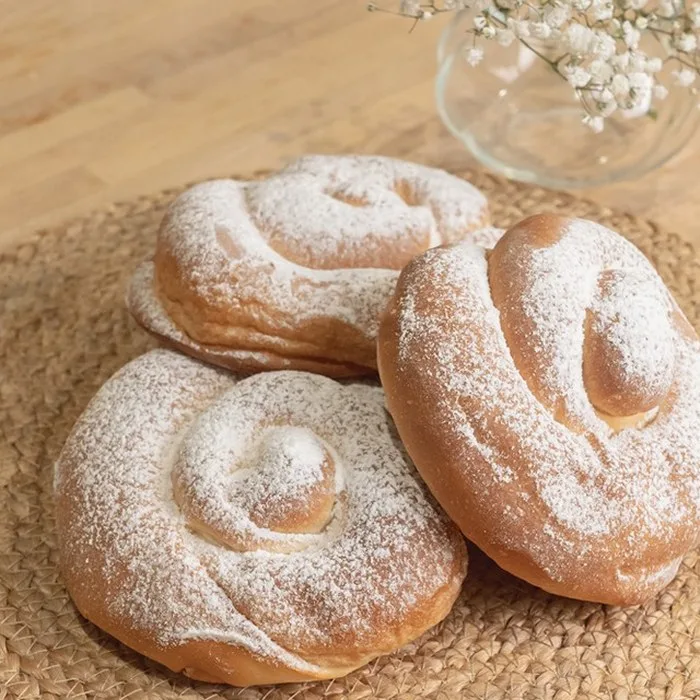
Ensaimada is a Spanish classic for good reason — yeast does most of the work, and the method is simple enough for a weeknight. Most of the time is hands-off while the oven does its thing, which makes it an easy one to fit around other dishes. Read through the tips before you start — a couple of small details go a long way with this one.
- Level Easy
Ingredients
- 5 g Yeast
- 200 g Caster Sugar
- 2 medium Egg
- 600 g Strong white bread flour
- Drizzle Vegetable Oil
- 100 g Lard
Method
- Pour 230ml lukewarm water into a bowl and add the yeast. Leave to stand for 3 mins, then add the caster sugar, eggs, flour and 1 tsp sea salt flakes. Mix together to form a dough, then knead for 10 mins in stand mixer using a dough hook (or 15 mins by hand) until the dough is elastic enough to be almost see-through when stretched. Cover and set aside to rest for 30 mins, then cut into four equal pieces. Transfer to a baking tray lined with baking parchment. Leave to rest for another 30 mins.
- Oil the work surface and a rolling pin with vegetable oil. Working with one portion of dough at a time, flatten it against the surface using the palm of your hand, then roll it out into a thin rectangle, about 30 x 50cm. Let it rest for 2 mins while you spread a quarter of the lard over the top. (If you want to fill your pastry with sobrasada de Mallorca, mix 50g lard with the sobrasada, and spread this over the dough instead.) Pull one corner of the flattened dough and stretch it out as far as it will go without breaking. Repeat every 10cm or so around the dough rectangle in every direction until it reaches about 50 x 70cm.
- Cut a strip from each of the shorter sides and lay these beside each other along one of the longer sides of the rectangle; this is what we call the heart of the ensaimada. From there, begin rolling the dough until you have a long pastry snake. Repeat with the remaining portions of dough.
- Take the first roll of dough and stretch it until it is over a metre long. Then, roll it up into a spiral, leaving 1cm between each turn of the spiral so the dough can expand. Flatten a little and transfer to a baking sheet lined with baking parchment. Repeat with the remaining dough. Leave to rise in a warm place for at least 12 hrs, or ideally 24 hrs.
- Heat the oven to 200C/180C fan/gas 6. Put the ensaimadas in the top third of the oven and immediately reduce the temperature to 180C/160C fan/gas 4. Bake for 18 mins until dark golden. Leave to cool on a wire rack. To fill your ensaimada with whipped cream, slice and open, then spread over the cream and close. Dust with a generous amount of icing sugar, if you like and cut into pieces to serve.
Tips for the best Ensaimada
- Rest the finished dish for a few minutes before serving — it lets the flavours settle and the texture firm up.
- Do not crowd the pan. Cook in batches if needed so everything browns instead of steaming.
- Use a kitchen scale for the dry ingredients if you have one — baking is less forgiving than cooking.
- Read the whole method before you start and measure out the 6 ingredients first — it keeps the pace relaxed once the heat is on.
Variations
- Swap the egg for silken tofu — keep the cooking time similar and check for doneness.
- Vegetable boost: stir in a handful of spinach, peas or diced peppers in the last few minutes of cooking.
- Spicier version: add a pinch of chilli flakes or a sliced fresh chilli with the aromatics.
Serving ideas
Dust with icing sugar just before serving and pair with coffee or tea.
Storage
Keeps in an airtight container at room temperature for 2–3 days, or refrigerated for up to a week. Most versions freeze well for 2 months.
Frequently asked questions
Can I make Ensaimada ahead of time?
Yes. It actually improves after a few hours, so make it earlier in the day and reheat gently before serving.
Is this Ensaimada recipe easy to make?
It is rated easy: 6 ingredients and 5 steps. Follow the order and the tips above and it is very forgiving.
What can I substitute for yeast?
Any ingredient with a similar texture and cooking time works; see the variations below for ideas. Keep quantities the same and adjust seasoning at the end.
Recipe data via TheMealDB — source



0 comments